Last year I made a casserole cozy. I just sort of winged the pattern (although there are definitely patterns you can buy for similar objects online), and since then, a few folks have asked how I made it. I finally took a few minutes to write up a pretty basic tutorial. You’ll need some intermediate sewing skills for this. I didn’t take any progress photos, but I did whip up some very basic line drawings. I think having done some sewing before will help you decipher my descriptions and drawings.
For a 9×9 casserole dish, you’ll need about a yard of cotton fabric and at least a yard of Insul-Bright or similar. Add more for larger dishes.
You’ll also need a few inches of velcro tape and some bias tape.
You also need two wooden dowels, or two (very) long-handled spoons.
How to make it
You’ll be making essentially two rectangles, then putting them together in a plus shape.
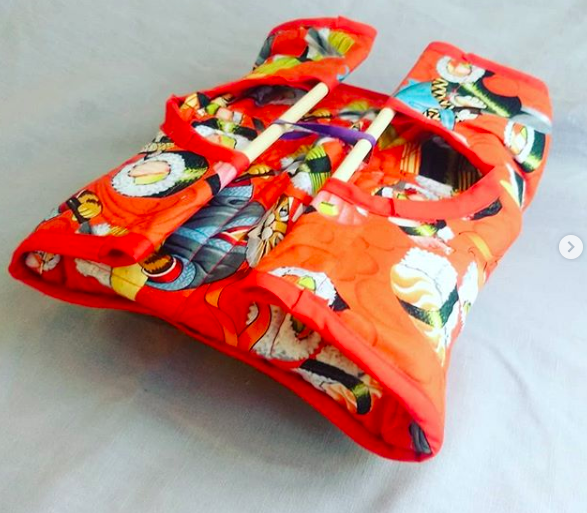
The final product, when unfolded, looks like this:

First rectangle
The first rectangle’s width will be the width of your casserole dish. Call that number X.
To find the length, take a tape measure and wrap it around the long side of your casserole dish, then add ~5 inches. Call that Y.
Cut two rectangles X by Y from the cotton fabric and one rectangle from the Insul-Bright. Quilt the three rectangles together and bind the edges. Attach Velcro to the rectangle–the hooks on one short side of the rectangle, and the loops on the opposite short side on the opposite side of the fabric so that when you wrap the Velcro around your casserole dish you can Velcro the rectangle shut in a tube. How far from the edge, exactly, you place the Velcro, will depend on your specific casserole dish, so play around with it.
Second rectangle
This one requires a tiny bit of math.
The second rectangle’s width will be the same as the first (X).
To find the length, wrap a tape measure around the short side of your dish, then add about two inches. Call this measurement Z.
Take that length measurement and double it. Call it (conveniently) 2Z.
Draw a rectangle (with chalk) on your fabric, or on tracing paper, with dimensions X by 2Z.
Then, divide Z in two. Call it 1/2 Z. Mark your fabric 1/2Z inches from the left side of the rectangle, and 1/2Z inches from the right side of the rectangle. This is a little difficult to visualize, so here’s a drawing:
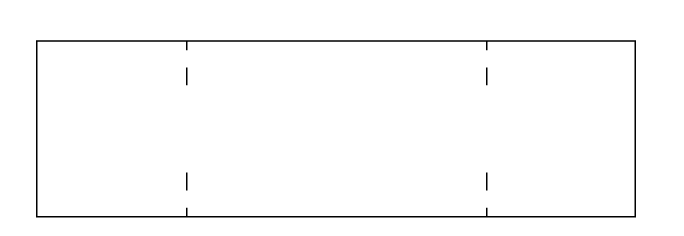
Say your original Z measurement was 20 inches. That means your rectangle length would be 40 inches, and you’d make marks at 10 inches (10 inches from the left side) and 30 inches (10 inches from the right side).
At the marks, draw circles centered on the marks. (I traced around a bowl.)
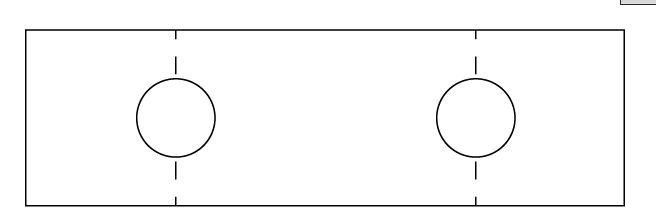
Cut two of these shapes from your cotton fabric and one from the Insul-Bright. Again, sandwich them together and quilt.
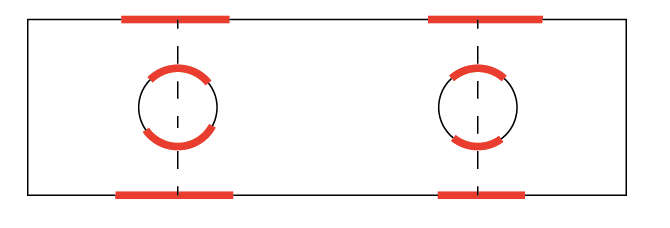
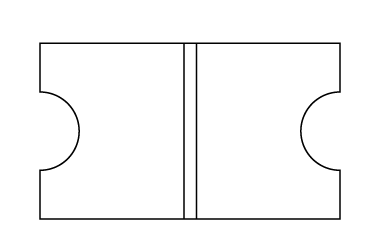
Add binding where marked in the following drawing.
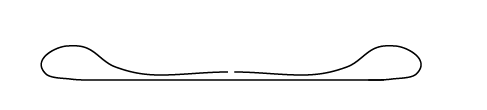
Fold the short edges to meet in the middle. It’ll kinda look like this.
From the side, it’ll kind of look like this.
Bind the edges (essentially, everywhere that wasn’t bound in a previous step, you now want to bind together as one sandwich. It would probably be a good idea to grade your seams, because you’re looking at 6 layers of fabric in some places.)
Your goal is one rectangle where everything is bound together as one EXCEPT for the places marked in blue below:
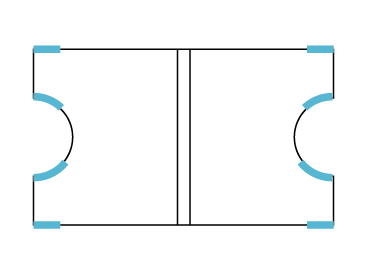
You’ve essentially made fabric loops where those blue places are, which you’ll eventually insert your spoons or dowels into.
Lay the plain rectangle you made in Step 1 crosswise atop the rectangle you just finished, and sew them together.
You’re done! Stick the dowels through the loops and admire your new cozy.

This is amazing. Thanks for the detailed instructions
LikeLike